
How to Integrate ESET with Xeams
Xeams can use ESET file scanner to detect emails that contain viruses. This is a four-step process:- Add Xeams's installation directory to ESET's file scanning exclusion.
- Download the special file containing the process you need to run. See Step 2 for details
- Modify the Profile_1.xml file in
$INSTALL_DIR\configfolder and enable a custom filter. - Enable additional logging to confirm ESET is scanning the files.
Step 1 - Set new temp directory and add Xeams installation directory to ESET's exclusions
1. First, go to the installation directory of Xeams, then create a folder named temp. Next, modify server.properties to specify that new folder as the temp directory.
To do this, add the following line:
java.io.tmpdir=C:/Xeams/temp
The above example assumes C:\Xeams is the installation directory, and temp is the name of the folder. If the directory is different, specify the correct path. Note: the slash is always
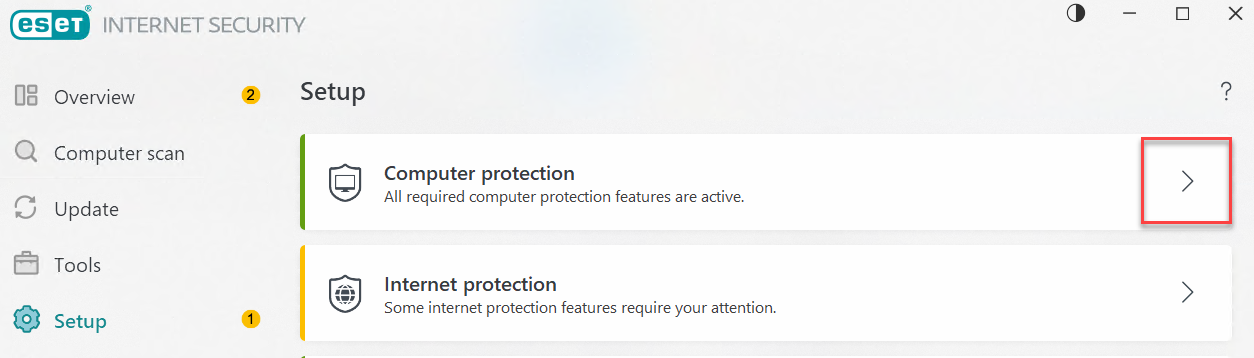
2. Next, add Xeams's installation directory to ESET's file scanning exclusions. This is important because every email that comes in gets processed in the temp folder. If the file gets removed by ESET in Xeams, then the email will never show up, making it very difficult to track the email.
To add Xeams to the exclusion, open ESET, then go to SETUP Computer Protection, then click on the > sign as shown below:
Next, in "Real-time file system protection", click on the gear icon, to access exclusions:
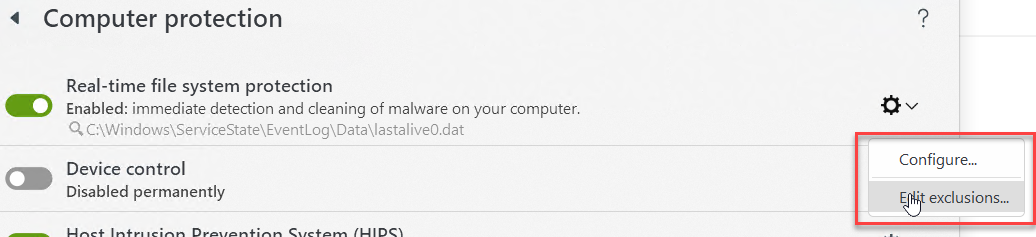
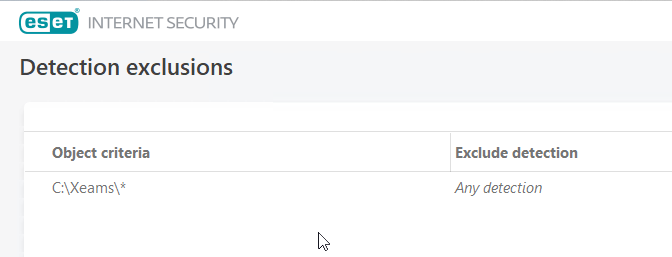
Add the directory of Xeams as shown below. Your installation directory might vary, so include the correct path:
To do this, add the following line:
java.io.tmpdir=C:/Xeams/temp
The above example assumes C:\Xeams is the installation directory, and temp is the name of the folder. If the directory is different, specify the correct path. Note: the slash is always
/, regardless if it's Windows or Linux.
2. Next, add Xeams's installation directory to ESET's file scanning exclusions. This is important because every email that comes in gets processed in the temp folder. If the file gets removed by ESET in Xeams, then the email will never show up, making it very difficult to track the email.
To add Xeams to the exclusion, open ESET, then go to SETUP Computer Protection, then click on the > sign as shown below:
Next, in "Real-time file system protection", click on the gear icon, to access exclusions:
Add the directory of Xeams as shown below. Your installation directory might vary, so include the correct path:
Step 2 - Download XML file
- Download the ExternalTool.xml file here
- Move this file to the
$INSTALL_DIR\configfolder. - Note: This XML file assumes the path to the ESET scanner is:
C:\Program Files\ESET\ESET Security\ecls.exe. If this directory is different, modify line number 5 to the correct file.
Assigning Score
Xeams will assign a score to email in two conditions:- By parsing the exit code of the external process. This is done by specifying the
exitCodeparameter in ExternalTool.xml file. - By parsing the standard output
Step 3 - Modifying Profile_1.xml file
Add a custom filter for Profile_1.xml file with the following contents:
<customFilter>
	<className>com.synametrics.xeams.rulesengine.custom.ExternalTool</className>
	<weight>100</weight> <!-- assign a weight -->
	<enabled>true</enabled>
	<origin>1</origin>
	<lastModified>1066309746000</lastModified> <!-- represents the date this rule was added -->
</customFilter>
Step 4 - Adding additional logging
To enable additional logging tools for ESET usage with Xeams, you will need to modify the contents of logconfig.xml. This file is located in your main $INSTALL_DIR/ folder. Once you edit this file, you will notice there are two sections:
- The appender
- The category
Each appender must have a corresponding category. The Appender specifies where the content is logged, such as the log name, size, and location, whereas the Category specifies what content is logged.
Appender<appender name="EXTERNAL_TOOL" class="org.apache.log4j.RollingFileAppender">
<param name="File" value="logs/ExternalTool.log" />
<param name="Append" value="true" />
<param name="MaxFileSize" value="5MB" />
<layout class="org.apache.log4j.PatternLayout">
<param name="ConversionPattern" value="%d %-5p %c{2} - %m%n"/>
</layout>
</appender>
Category
<category name="ExternalTool" additivity="false">
	<priority value="DEBUG" />
	<appender-ref ref="EXTERNAL_TOOL"/>
</category>
Once modifying the file, save it, then restart Xeams. You should see the new log file show up in your $INSTALL_DIR/logs directory.