
Using OAuth 2.0 with Exchange Online for sending outbound emails
It has become increasingly challenging to send emails from devices and application servers because many SMTP servers now require the use of OAuth 2.0, which legacy devices and applications cannot support. To bridge this gap, you can use Xeams. This page provides information on how to configure your devices and application servers to send emails to Xeams, which will then deliver those messages through your Exchange Online account.
Relaying To Exchange Online (Office 365) Part 1 of 3
Microsoft offers multiple methods for relaying messages from MFP devices or on-premises application servers. These methods are described in detail on How to set up a multifunction device or application to send email using Microsoft 365 or Office 365.
This is the first part of a three-part series that compares the different methods Microsoft uses to accept emails from your on-premise SMTP server. The remainder of this page talks about Authenticate an SMTP connection using OAuth
Use Case
Consider the following scenario:
- You have an application server or a device, such as a printer, that generates emails. Assume the sender of this email is accounting@yourcompany.com, and the recipient is client@yahoo.com.
- You're using Microsoft Exchange Online to host your domain.
- This app runs on a network that is either behind a dynamic IP address or has outbound port 25 blocked, forcing you to send your emails through Microsoft's SMTP server.
Recent policy changes in Microsoft requires you to use OAuth 2.0, which is a more secure mechanism to authenticate users. As a result, legacy devices and application servers are unable to send emails.
Solution
Use the following solution to route such emails:
- Install Xeams inside the same LAN where your application server/device is located.
- Configure your application server/devices to send outbound emails to Xeams. This can be done without authentication since both Xeams and the application server are inside a trusted network.
- Xeams can authenticate with Microsoft's servers using OAuth 2.0 to deliver emails.
The following diagram shows the flow.

Prerequisites
You must complete the following tasks before proceeding:
- Downloaded and installed Xeams.
- You must be using Exchange Online for your primary email server. This option does not work with free accounts on Hotmail or Outlook.com.
Device/App Server Configuration
Most devices and application servers accept values for SMTP servers when they need to send outbound emails. If your device and Xeams are running on the same network, you can use the local IP address or hostname of the machine running Xeams for the SMTP server.
If needed, you can create users in Xeams and then specify those users for SMTP Authentication. Alternatively, you can allow certain IP addresses in Xeams to relay.
Xeams Configuration
You must configure the Smart Host (under Server Configuration) to route messages through Exchange Online.
When using OAuth, an app is needed on https://portal.azure.com with proper permissions, scopes, and APIs. Xeams offers two options when using OAuth with Microsoft:
- Using an App Registered by your organization - more work, but full control.
- Using an App Registered by Synametrics - less work
Instructions
- Log in as an administrator
- Click Server Configuration > Manage Smart Host
- Select an desired option for authentication, as shown below.
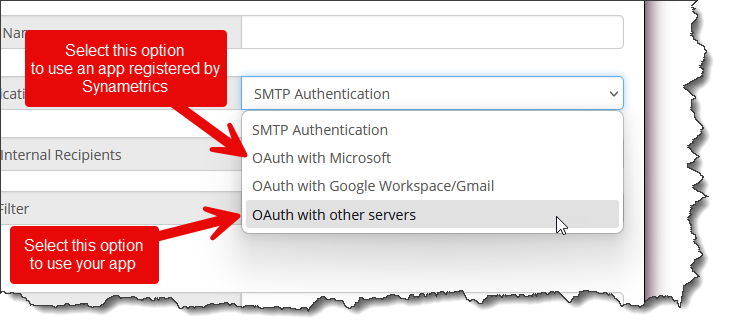
Select the desired tab below for further details.
Use this option if you want to register an app yourself. During configuration, you will be prompted for the following parameters:
- User ID
- Client ID
- Client Secret
- OpenID Connect metadata document
- Scope
The remainder of this document talks about steps you need to take to get the values for these parameters.
App Registration in Azure
The User ID above refers to any valid user in your company, with an email that is hosted on Exchange Online. Values for the remaining two configuration parameters mentioned above are obtained by registering an app in Azure. The following section discusses step-by-step instructions on how to achieve this goal.
- Log in to your account on https://portal.azure.com/ and click App registrations. You may also search for "App registrations" in the search bar.
- Click New registration on the upper left-hand corner
- Enter the values as displayed in the image below. You can modify the Name as desired.
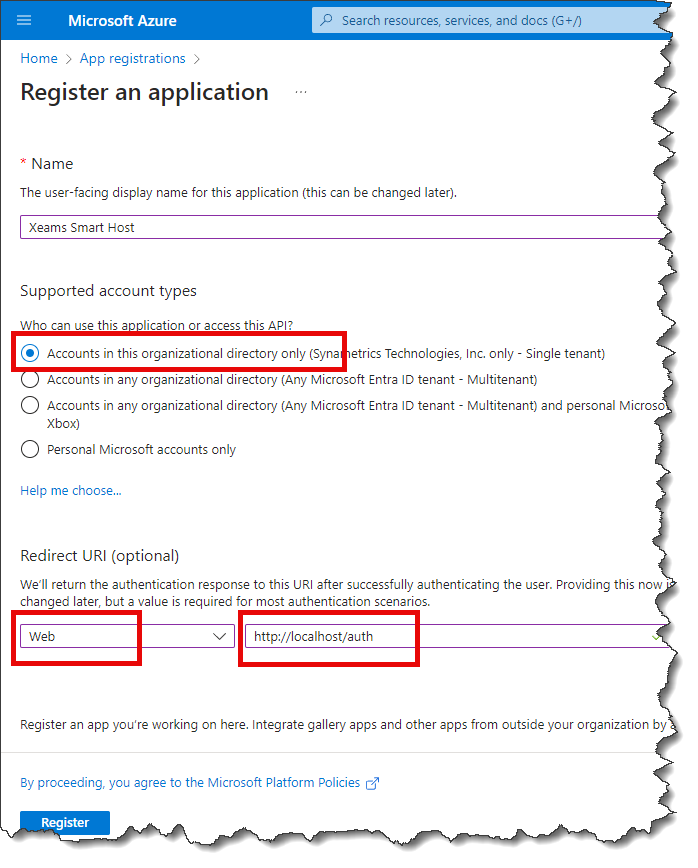
- For the time being, enter
http://localhost/authfor Redirect URI. We will add/modify this value later on. - Click the Register button.
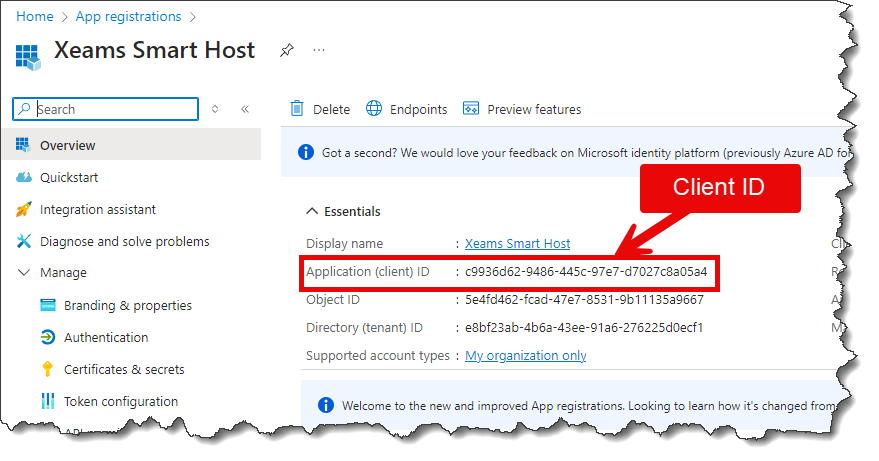
The value for the Client ID field is displayed on the page after you register the app. Refer to the image below.
- Click API permissions on the left.
- Click Add a permission, select Microsoft Graph, Delegated permissions, search for SMTP,
and finally, check the box next to SMTP.Send, as shown in the image below.
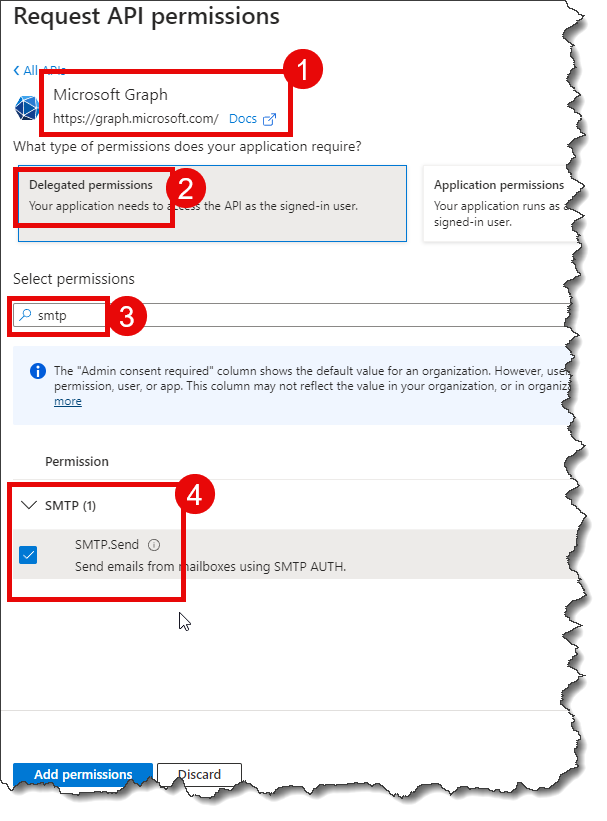
- Click Add permissions
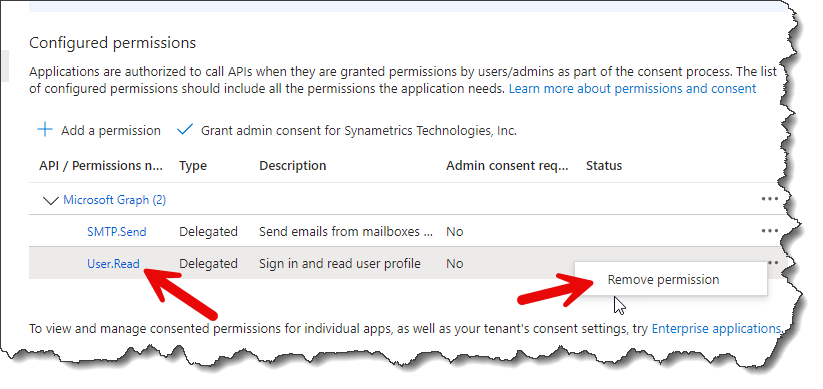
- Optionally, remove the existing User.Read permission as shown below.
- Click Certificates & secrets on the left.
- Click New client secret.
- Specify a Description and change the exipiration period if desired. You will have to recreate the secret by repeating this step once it expires.
- The value for the Client Secret is displayed on the following page.
Client the copy button to put this value into your clipboard and page it in the Client Secret field
in Xeams. Refer to the image below.
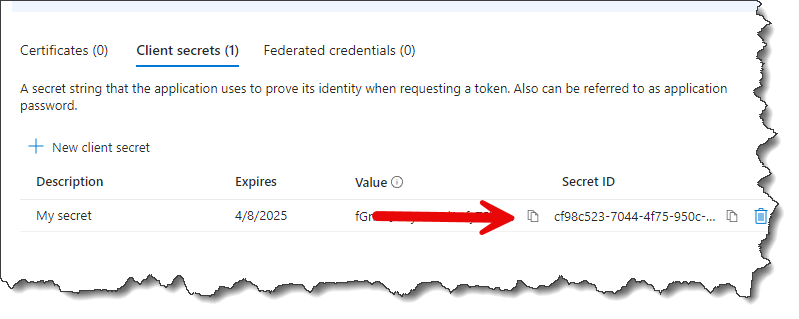
Important
You see two values on this page. DO NOT copy the value you see under the Secret ID column.
- Click Authentication on the left.
- Open Xeams' web interface in a different tab, go to Server Configuration/Manage Smart Host, select
OAuth with Microsoft, an add the URIs you see on this page to the Authentication page in Azure. See image below.
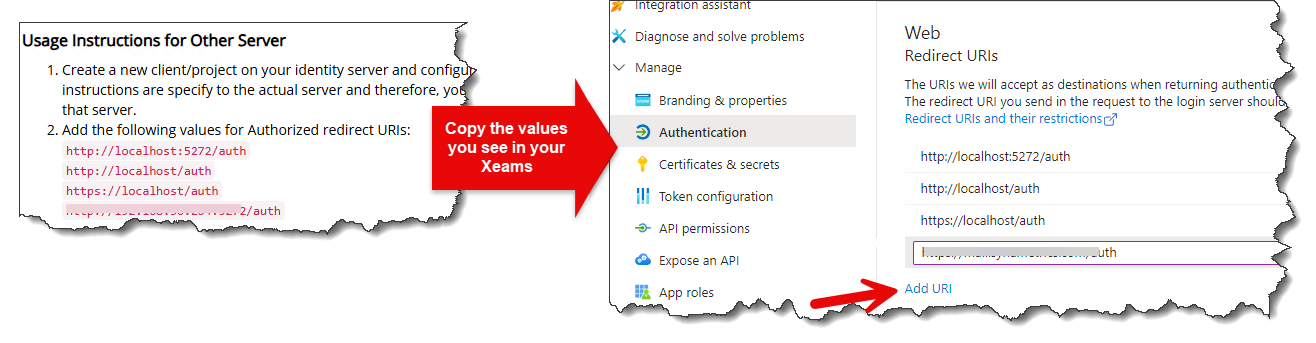
- Click Save
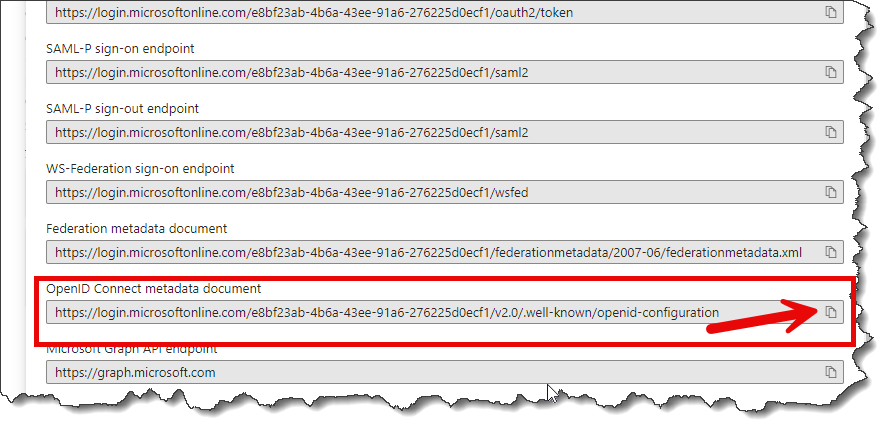
- Click Overview on the left, and then click the link for Endpoints.
- Score down and copy the value for Open ID Connect metadata document to your clipboardand paste
that in Xeams web interface.
 .
.
- Now you have the values for every field as shown below.
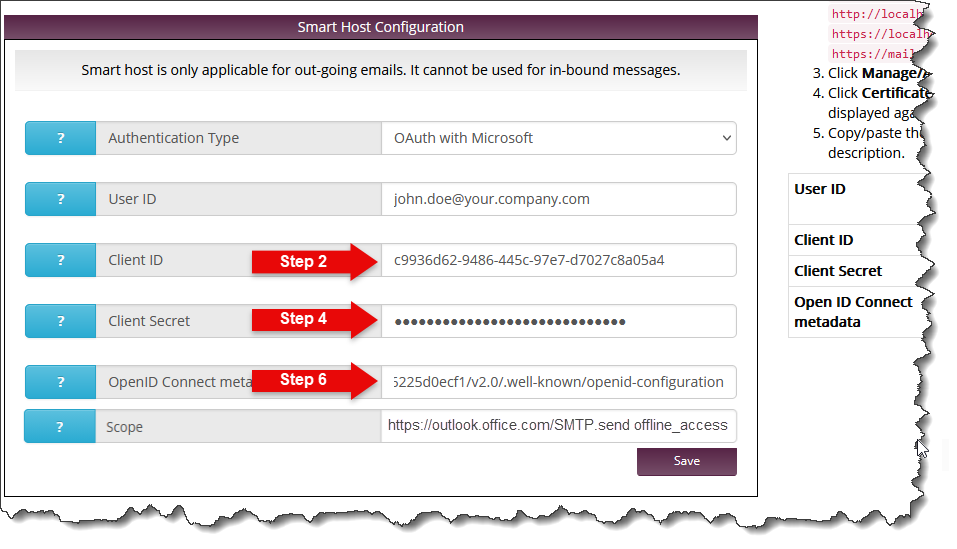
- Type
https://outlook.office.com/SMTP.send offline_accessfor the Scope field. - Finally, click the Save in Xeams.
- You will be redirected to Microsoft's login page. You must grant permission to your newly created app. Once done, you will be able to send emails through Microsoft's SMTP.
To facilitate OAuth, Synametrics Technologies, Inc. has regsitered an app with Microsoft with proper permissions.
- Authentication Type - Select OAuth with Microsoft
- User ID - Specify a valid email address, which will be used for authentication as well as the sender if the emails.
- Click Save.
- You will be redirected to Microsoft's login page. Complete the login step by following instructions on the screen.
- Very Important - You will see the following screen during the login process.
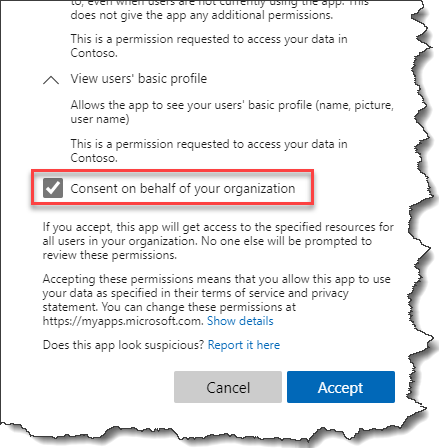
You must check the box you see above in order for this option to work. If you don't see this page, that means you have not signed in as an administrator.
Once completed, you will be able to send emails through Exchange online.
Important
When using the method, no passwords or access tokens are shared with Synametrics.Configurating Send As
Microsoft's policy restricts you from specifying any email address but the one you put for the User ID field in Xeams.
No further action is required if you're okay with this limitation. However, if you need to send emails from other senders in your organization, you must configure Send As permission for that user. Follow instructions on this page for details.
You will receive the following error if this permission is not granted.
554 5.2.252 SendAsDenied; john.doe@yourcompany.onmicrosoft.com not allowed to send as janedoe@yourcompany.com;
STOREDRV.Submission.Exception:SendAsDeniedException.MapiExceptionSendAsDenied; Failed to process message due to a permanent exception with message...
Limitation when using OAuth
Microsoft's policies require that, when using authentication, the sender of the email (as shown in the From field of your email) must be a valid user. Consider the following email as an example:
From: hp_printer@yourcompany.com
To: john.doe@yourcompany.com
Subject: Scanned PDF
In this case,
hp_printer@yourcompany.com must be a valid user. Microsoft will
reject the message if you send an email from a user who does not exist.
If you wish to send emails from invalid users, such as "no-reply@yourcompany.com", "alerts@yourcompany.com", "server-status@yourcompany.com", etc, you
must use other methods specified on this page.