
Two Factor Authentication in Xeams
In addition to user id/passwords, Xeams supports two-factor authentication (2FA), also known as multi-factor authentication (MFA), and is available for administrators and non-admin users. Two types of validation are available:
- Email: a six-digit code is sent to the email of the user
- Temporary One-Time Password (TOTP): a six-digit code is displayed on a mobile device. This code changes every 30 seconds. Users will need an app on their mobile device that supports TOTP, such as Google Authenticator, Microsoft Authenticator, Duo or others.
Enabling 2FA
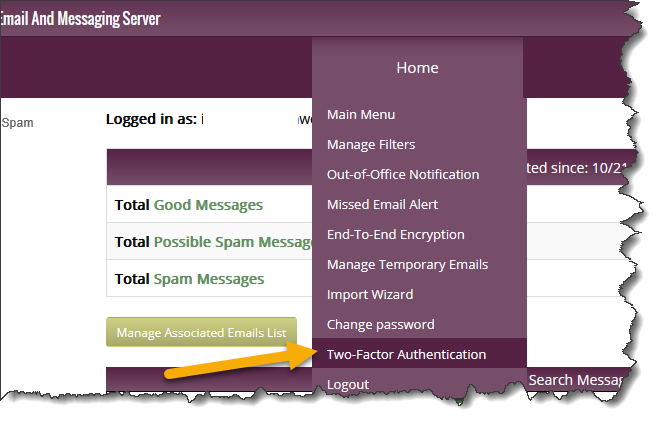
To enable 2FA for the account, click Two-Factor Authentication under the Home menu. See the images below.


Enforcing 2FA
Administrators can enforce 2FA/MFA across the board for every user. To do that, click Server Configuration, select the Advanced tab and check Mandatory 2FA.
Xeams will force users to use 2FA if this option is checked.
Temporarily Disabling 2FA
It is possible for users to lock themselves out if either they lose their mobile device. Therefore, Xeams allow administrators to temporarily disable 2FA for selective users.
Following steps demonstrate how to disable 2FA for a single user.
- Log in as admin
- Click Server Configuration/Manage Users
- Clicking the Enabled link under the 2FA column for any user will disable it temporarily.
- Following image demonstrates three users with different values for 2FA.

Bypassing 2FA for Administrators
When connecting from localhost you can optionally bypass administrators from using 2FA. This is done by adding
the following line in server.properties file.
skip.2fa.from.localhost=trueNote that this option is only applicable when connecting from
localhost.
Clustering and 2FA
2FA settings are not cluster-enabled. This means if you enable 2FA on the master, slaves will not use the same settings. This is done by design to enhance security as well as preventing lockouts.
When using TOTP for 2FA, you may run into a name collision since both master and slaves are called "Xeams". You will get an error in your mobile app when trying to scan the QR code on the slave machine. Use the following steps to avoid this name collision:
- Connect to the slave machine at the OS level - using Windows File Explorer or SSH, if using Linux.
- Go to
$INSTALL_DIR\configfolder. - Add the following line in server.properties file:
totp.issuer.name=xeams_slave1
- You could optionally change the phrase
xeams_slave1to any other unique value. - Save the file and restart Xeams
Enabling 2FA For Users
Non-admin users can enable 2FA for their account using the following steps:
- Log into your account
- Click two-factor Authentication under the Home menu. See image below.
- Follow directions on the screen to complete the process.